Kevin's Papers
Technical Papers by Kevin Morrison
Steps for Akeeba Backup
There is some confusion on how to move a Joomla website using the powerfull Akeeba Backup tool. Although this is a very straight forward process it can seem daunting to those who have never used it before. I assure yuo that there are no hidden processes or tricks to using this tool and here I will give you a very straight forward tutorial on how to move through the process of moving your Joomla website using Akeeba Backup.
I will assume that you already know how to use Akeeba Backup to create a backup of your site and how to download it to your computer. I will note that although the tool does offer a browser based download feature it is best to use an FTP program to login and download your backup. With that said you should have already backed up your site and downloaded it to your computer. The next step is to FTP the backup archive to the new website and along with that file you will need the kickstart.php file from Akeeba that you can get from HERE.
The next step is to login to your web accounts cPanel and create a user and a database for your new site. With that done the last step is to decompress the files in your backup and install the Joomla site to your new location.
START THE KICKSTART.PHP FILE
Open your browser and type in your domain as shown in the image below, replacing "yourdomain" with the name of your website address.
![]()
FIRST STEP
The first screen that you will see when you hit enter is as follows:

This is simply some things you should know and if you are ready to proceed click the link at the bottom to continue.
DECOMPRESS THE BACKUP FILE
The next screen is the start of the decompression process and unless you have some custom needs you can just click the start button to decompress the files to your public_html directory.

RUN THE INSTALLER
Once the files are decompressed the next screen is just to show that all the files were decompressed and you are ready to begin the database setup. If you receive an error here, review the instructions to find out where you went wrong.
CHECK SERVER CONFIGURATION
This next screen does a check of your servers configuration and reports anything that might stop the installation or settings that are not optimized for Joomla to run. If anything here is in red consult the documentation and get with your server admin to see if they can help you setup the server with the proper settings to run Joomla.

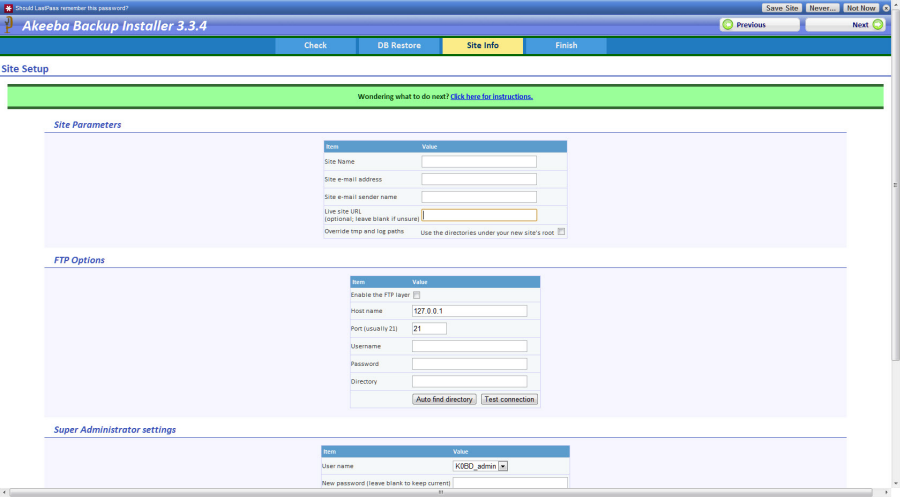
SETUP & INSTALL THE DATABASE INFORMATION
We are now ready to give Akeeba Backup the information regarding your new database name, user name and password. Once you fill in the details here Akeeba will configure and setup your database. For optimal performance make sure to use MySQLi for your database type. Even if you are coming from the older less refined MySQL, all of the tables will be setup to work with the new configuration.
After the database is setup you will need to setup any FTP layers if you need them and here you can select your users and change the passwords if you so desire. Other than that just check and make sure the paths to the temp and log directories match your new sites configuration and you are ready to move on to the next step.

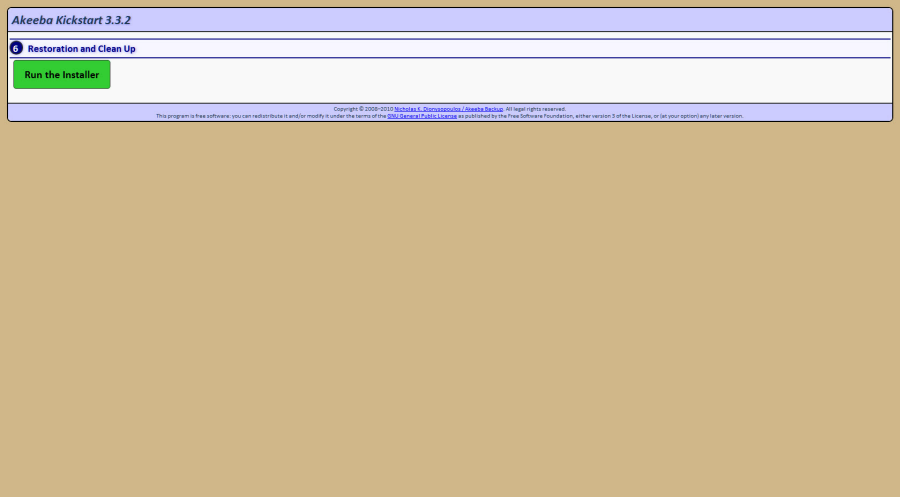
FINALIZE AND CLEANUP
The final steps are to remove the installation directory and view your new site. Click the cleanup button to remove this folder and then there is another clean up tool that will remove the compressed file and the kickstart.php file. Make sure that these two files are removed and if you did not save your Akeeba backup with a password then anyone who knows this file exists can overwrite your site and take control of it.
The last step that is outside of the installer but one that many people forget to do is to setup and enable the .htaccess file. If you are using the Joomla SEF URL's then this file will need to be setup or you will only see the home page and the rest will result in a 404 error page not found.
When you subscribe to the blog, we will send you an e-mail when there are new updates on the site so you wouldn't miss them.